Quick Data Analysis
This tutorial takes you on a high level tour on how to use fastdup to quickly analyze an image collection. We show how you can get started with using the core functions of fastdup in no time.
By the end of this tutorial you'll learn how to use fastdup to find:
- Broken images.
- Duplicate image pairs.
- Outliers.
- Dark, bright and blurry images.
- Image clusters.
If you're new, start here.
Installation and Setting Up
If you're running fastdup for the first time, we recommend to run this tutorial on Google Colab.
Or if you're feeling adventurous, feel free to install on your machine and proceed. For a detailed list of installation options and supported platforms, see our installation guide.
In most cases you can install fastdup with:
pip install fastdupTo verify the installation, run:
import fastdup
fastdup.__version__
This should show the version of fastdup you've installed.
This tutorial runs on version 0.906.
Download a sample dataset
We'll use the Oxford-IIIT Pet Dataset which contains 7,300 images of cats and dogs from 37 breeds.
Let's download and unzip the images with:
wget https://thor.robots.ox.ac.uk/~vgg/data/pets/images.tar.gz
tar xvf images.tar.gz
Once done you should end up with a folder images/ in your root directory.
Run fastdup
It only takes 3 lines of code to run fastdup:
import fastdup
fd = fastdup.create(work_dir="fastdup_work_dir/", input_dir="images/")
fd.run()
Parameters forfastdup.create
work_dir- Path to store the artifacts generated from the run.input_dir- Path to the images.
fastdup will start analyzing the dataset for potential issues. How long it takes to complete the run depends on your computing power.
Run timeOn Google Colab (free version with 2 CPU cores) it take a little over 3 minutes to complete the run!
Once the run finishes, we can visualize all the issues found.
Invalid Images
This is one of the most common issues with image dataset. The images could be broken or corrupted. fastdup keeps track of all invalid images it encounters during the run.
To view the details of the invalid images, simply run:
fd.invalid_instances()which outputs a Pandas DataFrame:
| img_filename | fastdup_id | error_code | is_valid | |
|---|---|---|---|---|
| 0 | Abyssinian_34.jpg | 135 | ERROR_ZERO_SIZE_FILE | False |
| 1 | Egyptian_Mau_139.jpg | 2240 | ERROR_ZERO_SIZE_FILE | False |
| 2 | Egyptian_Mau_145.jpg | 2247 | ERROR_ZERO_SIZE_FILE | False |
| 3 | Egyptian_Mau_167.jpg | 2268 | ERROR_ZERO_SIZE_FILE | False |
| 4 | Egyptian_Mau_177.jpg | 2278 | ERROR_ZERO_SIZE_FILE | False |
| 5 | Egyptian_Mau_191.jpg | 2293 | ERROR_ZERO_SIZE_FILE | False |
Something unexpectedBroken images is something we did not expect to see especially with a curated dataset like the Oxford IIT Pet Dataset. But this shows how easily you can detect them with fastdup with just one line of code.
Duplicate Image Pairs
Let's now visualize if there are any duplicates with:
fd.vis.duplicates_gallery()which outputs:
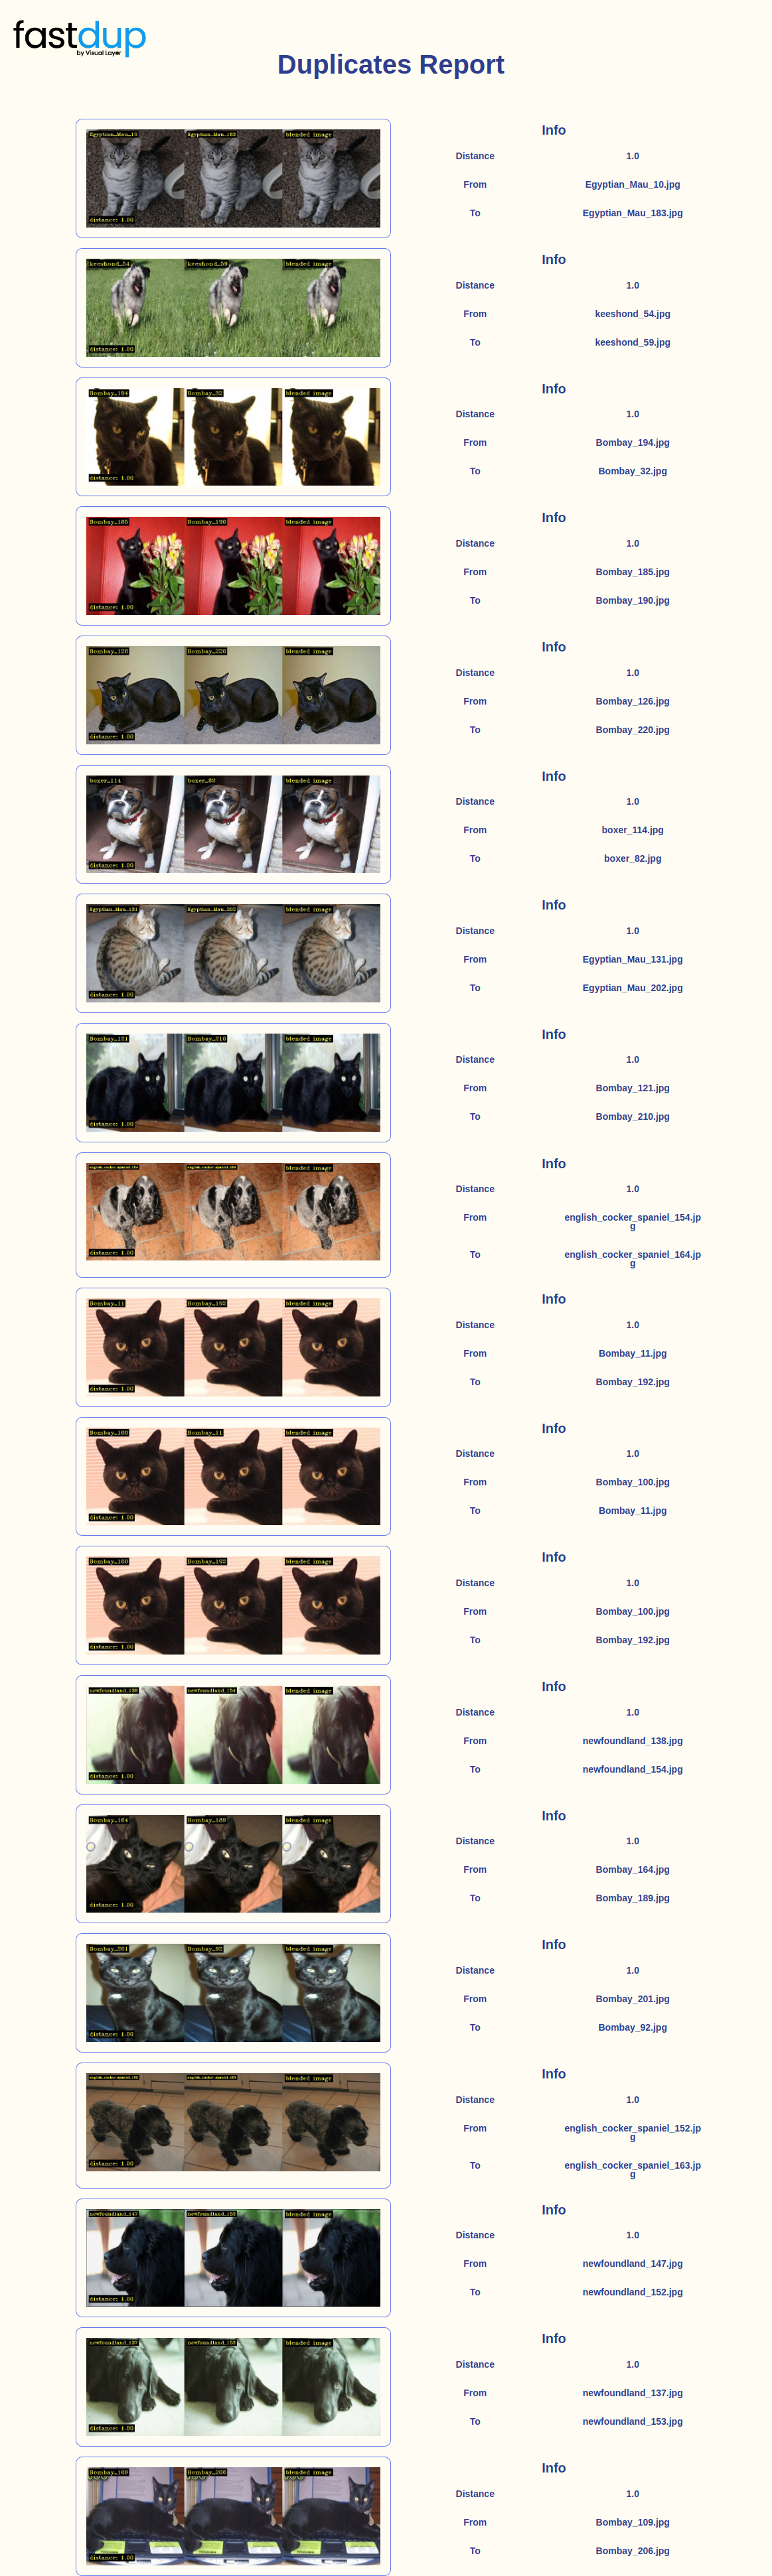
Under the hoodThe above gallery shows duplicate pairs computed using the
cosinedistance. A distance of1.0indicate the image pair is an exact duplicate.TIP: You can specify
num_imagesas a parameter tofd.vis.duplicates_galleryto see more or less image pairs. For example:fd.vis.duplicates_gallery(num_images=5)
Outliers
Similar to duplicate pairs, you can visualize potential outliers in your dataset with:
fd.vis.outliers_gallery()which outputs:

Verify outliersAs you can see, not all images in the outliers report are true outliers. The images appear on the report simply because it looks different from other images in the dataset (distance wise).
As a curator, you'd need to verify if they are true outliers by inspecting the report.
Dark, Bright and Blurry Images
fastdup also lets you visualize images from your dataset using statistical metrics.
For example, with metric='dark'we can visualize the darkest images from the dataset.
fd.vis.stats_gallery(metric='dark')which outputs:

In contrast, metric='bright'populates the gallery with the brightest images on top.
fd.vis.stats_gallery(metric='bright')which outputs:

Similarly, metric='blur'shows the blurriest images on top.
fd.vis.stats_gallery(metric='blur')which outputs:

Verify dark, bright and blurry imagesAgain, we see that not all images in the statistical visualization gallery are problematic. As a curator, you'd need to verify and filter out the problematic images.
Since the Oxford Pets Dataset is a curated dataset, we'd not expect to find extremely bright, dark or blurry images.
Image Clusters
One of fastdup's coolest feature is visualizing image clusters. In the previous section we saw how to visualize similar image pairs. In this section we group similar looking image (or even duplicates) as a cluster and visualize them in gallery.
To do so, simply run:
fd.vis.component_gallery()which outputs:

TermClusters are known as 'components' in fastdup. You'd see the term 'component' used more frequently in code and documentations.
Summary
So there you have it. With few lines of code you can quickly sift through thousands of images in your dataset for potential issues. Not to mention, you can run it just by using Google Colab, with limited compute resource!
TLDRIn this tutorial we've seen how to use fastdup to find:
- Broken images.
- Duplicate image pairs.
- Outliers.
- Dark, bright and blurry images.
- Image clusters.
What to do about all the problematic images? You can decide to keep or eliminate them. Check out the next tutorial!
Updated 7 months ago
Now that we found some issues related to the dataset, let's see how do we clean and curate the dataset in the next section